PASSWORD ORGANIZER
USER GUIDE
Password
Organizer Requirements
Password Organizer Browser Requirements
My Identity Screen Explained
áááááááááááááááááá Quick Links
áááááááááááááááááá Hotkeys
Password
Organizer Toolbar Explained
How to Use Password Organizer
Basic
Steps
Filling
in Forms Automatically
Saving
Forms
Getting Started:
Overview
Password Organizer is an Internet Explorer companion application that makes it very easy for you to automatically fill in any web-based forms that would normally require you to repeatedly type in your details.á When you visit a website with a form on it, Password Organizer will offer to help you and you can choose to be helped.
Forms that need multiple personal details as well as login forms that
just need a user name and password can be filled in automatically.
Password Organizer Requirements
Pentium PC capable of running Windows 2000 and above.
Password
Organizer Browser Requirements
Password Organizer works with MicrosoftÆs Internet Explorer browsers of
version 6.0.
Installing
Password Organizer
It is important to remember to close all open browser Windows while installing Password Organizer. Once installation is complete a New Profile window to create a profile opens.
Installing Password Organizer will create a new toolbar in your Internet Explorer browser. See image belowá ôtoolbar1ö

áImage 1: toolbar1
ááááááááá
Password Organizer completes forms for you by filling in to forms details from a æprofileÆ. When you start using Password Organizer, you need to create a profile with all your information. Password Organizer asks you to fill in these details the first time.
Immediately after installation a New Profile window opens.
New Profile
See image belowá ônewprofilewindowö

ááááááááá
Image 2: newprofilewindow
You can start creating your profile by entering a name for that profile and assigning it a password. This password would need to be at least 5 characters in length. You will need this password subsequently to login to that profile to fill in details in web-based forms, to edit the profile data, and also to delete that profile.
You can also bring up the New Profile window by either of these two methods.
1. By choosing the New Profile option from the Toolbar Password Organizer Menu.
See image belowá ônewprofilefromtoolbarö
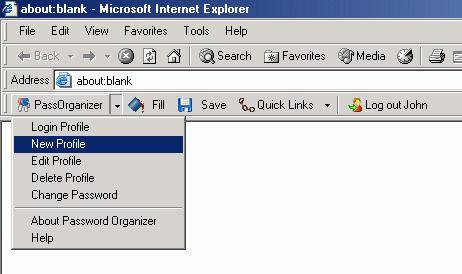
Image 3: newprofilefromtoolbar
2.á From the Start Menu - Program Files>Omniquad> Omniquad Password Organizer
Edit Profile
If
you are a returning user who has already created a profile, this option will
bring up the Edit Profile Window. To create a New Profile, click on the New
Profile button. See image below ôeditprofilenewbuttonö
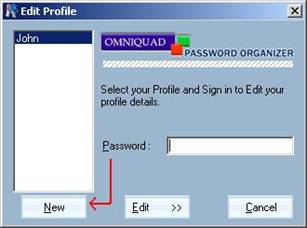
Image 4: editprofilenewbutton
Once you have entered a name for your profile and the password to access it, the My Identity screen opens. See image below ômyidentityö

Image 5: myidentity
My Identity:
Personal
Information is gathered in this step. Password Organizer will use this data to
fill website forms. This information is not transmitted back to us but is only
sent to sites that you ask Password Organizer to submit data. At any page, if
you wish to see what information is being filled and submitted, please hold
down the Shift key while pressing the Fill button. When you finish the last
field in any tab, press Enter to go to the next tab.
Fill
in all your personal details. Do not fill in any information you would not want
Password Organizer to fill in for you. (For example Credit Card)
Select Title: Mr., Mrs., Ms, Miss, Dr.
First Name: Your First Name as you would want it filled.
Surname: Your Last Name as you would want it filled.
Company: The name of the company you work for.
E-Mail address: The email address you want to submit to most sites.
After filling in the above fields, just press the Enter key and you will be taken to the Address Tab. Pressing Enter after the last field takes you to the next tab automatically. The address referred to here is any address you want to fill in repeatedly. This may be either your billing or shipping address. You can also get to that tab by clicking on it.á In this tab please fill in these details:
Address Line 1: This would be the first line of your address. For example: Door Number
Address Line 2: This would be the second line of your address. For example: Street Name or Number
Address Line 3: This would be the last line of your address. For example: Area
City: Type in the name of the city the address is in.
Select State/Province: Canadian and US citizens can select the state or province they live in. The rest will need to leave this field blank.
Zip/Postal Code: This will be the zip or postal code associated with the address filled in above.
Select Country: Select the country you live in.
See image ôaddressö

Image 6: address
Other
Details Tab:
Pressing the Enter key after selecting your country takes
you to the Other Details tab. This is where your telephone numbers, email
address, Date of birth etc is recorded. Your telephone number would be entered
in the following order: Country, Area, Number, and Extension. If you do not
wish to enter your country code, please enter your number from the second text
field onwards.
Home Telephone Number: Country, Area, your home telephone number, and any extension. This will be the æafter work hoursÆ number filled.
Work Telephone Number: Country, Area, your office telephone
number, and any extension. This will be the number entered in any form that asks
for day time numbers.
Mobile Phone Number: You mobile or cell number.
Fax: A number you can receive faxes at.
Select Sex:
Select Date of Birth: Month, Date and Year of birth. Age is calculated from this date and so you need not enter it separately.
See image below ôotherdetailsö
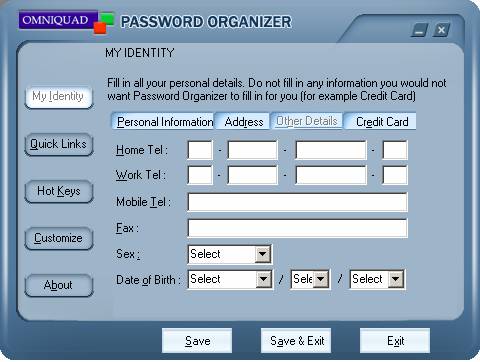
Image 7: otherdetails
Credit Card
Tab:
If
you do not wish Password Organizer to fill in details of your credit card, do
not fill in this section. Even if you do fill in this section, these details
will only be filled when you specifically ask for Credit Card data to be filled
in. Please exercise caution about what sites you chose to submit Credit Card
information to. Always press Shift and see what is being filled and submitted.
See image below ôcreditcardö

Image 8: creditcard
Select Card Type:á These are the supported card types: Visa, Mastercard, American Express, Diners Club, Carte Blanche, Discover, en route and JCB. Select your card type.
Card Number: This is the number on the front of your credit card.
Validation Code: This is a validation code usually found on the back of the card.
Select Valid From: Select the month and year of issue of the card.
Select Expires: Select the month and year the card is valid till.
Name: Enter the name of the cardholder.
Add Card
Once you have filled these fields in click on Add card to add the card to your list of credit cards. If you have any more cards to add to the list, then repeat the process with the new data.
Update Card
If you wish to make changes to the data on any card, select the card from the list, the details of the card will fill the respective fields, make what changes you need to and click on Update Card.
Delete Card
If you wish to remove a card from the list, click on delete and all data about the card is deleted.
Now that all these details have
been filled in your profile is ready. If you open a new Internet Explorer (IE)
browser window, you can see the Password Organizer Toolbar.
More about the My Identity GUI:
In addition to collecting Personal Information, the My Identity Screen also allows you to customize your Password Organizer experience.
Quick Links allows you easy access to the forms that you have saved. You can open the page itself directly by choosing it from the drop down menu on the Toolbar. You can add or delete saved forms from this option. You can identify the form from the Title, Site or URL.
Hotkeys:
Hotkeys for these basic operations lets you work more easily with Password Organizer. By default these hotkeys have been assigned to these operations.
Save Form: Ctrl Alt S
Fill Saved Form: Ctrl Alt F
Fill and Submit Saved Form: Ctrl Alt Shift S
Enable or Disable Password Organizer Prompting: Ctrl Alt D
You can change the keys to any combination you find comfortable.
Customize
Password Organizer intelligently analyzes web forms on any site you visit. And thus decides what to fill in each form encountered. However the Internet is a vast place and there will be forms that use new data types. Use this section to add new data types you find.
About
Product Name: Password Organizer
Copyright 2004 Omniquad
Version Beta
Technical Support: support@omniquad.com
Visit Us: http://www.omniquad.comá
á
See image below ôtoolbarö
![]()
Image 9: toolbar
This is the toolbar that Password Organizer installs. If no profile is signed in, only the PassOrganizer and Fill buttons are enabled. See image toolbar1. If any profile is signed in, Quick Links to forms saved in that profile, Save options and the Log out button are enabled.
The toolbar is explained below:
ááááááááá The PassOrganizer Button has a drop down menu for the following options.
1. Login Profile: This button allows you to login to your profile. Once you are logged in to your profile, Password Organizer will examine any webpage that you visit for forms that you need help in filling in and prompt you when it can help.á When there is no profile logged in, no data will be filled. Password Organizer will only prompt you to log in to your profile.
2. New Profile: This option lets you bring up the New Profile window to create a New Profile.
3. Edit Profile: This option lets you Edit a previously created profile. Requires password.
4. Delete Profile: This option lets you delete unused profiles. The password for that profile is required for deletion.
5. Change Password: This Password Organizer option lets you change the password of your profile. The existing password for that profile is required for this.
6. About Password Organizer: This brings up the support email address, the website URL and the copyright information.
7. Help: This Password Organizer user guide is accessible from this option as also from the Start Menu>Program Files>Omniquad>Omniquad Password Organizer
The Fill Button option lets you fill in forms where Password Organizer does not prompt you. Used with the Shift button, this will bring up a screen with whatever information is being filled on that page. This would help you detect if there are any hidden fields that Password Organizer has inadvertently filled.
The Save Button option lets you save a form. Once a form is saved, you can navigate back to the same saved form from the Quick Links menu option.
The Quick Links Button: When there are no saved forms, the drop down menu just shows a [None] value. Once forms are saved they can be accessed from here directly.
The Log out Button: This is the log out button for the user profile currently signed in. By default, a profile is logged out after 30 minutes of inactivity. When there is no profile logged in, no data will be filled. Password Organizer will only prompt you to log in to your profile.
How to use
Password Organizer?
Basic Steps
1. Install the software.
2. Create your profile.
3. Open an Internet browser window and continue using the Internet as you normally do. When you open a webpage with a form on it, Password Organizer will first see if it has the information in your profile to help you fill it. If it does it will ask you if you need any help filling the form. Only when you permit it, will Password Organizer fill in any information for you.
4. When you open a form for the first time, and enter any details in it, Password Organizer will offer to save the form for you. This would include all login forms. You can then sign into any of these login forms directly by choosing the right entry from the Quick Links toolbar button drop down options.
5. When you re-visit a form, Password Organizer will offer to either fill or fill and submit that form for you. If you choose to fill, the details will be filled in from the profile but will not be submitted. If you choose fill and submit, Password Organizer will automatically submit the form and open the resulting page.
6. If you want to create multiple entries at any website. Visit it and save it with your details. Then revisit the form, ignore Password Organizer Fill form prompt and enter in the new values and click submit. Password Organizer will now offer to save this as a new form. If you wish to overwrite the previous form, give it the same label. If you want multiple entries to the same form at the same URL, you can choose to save it under a different label. When you visit that form again, Password Organizer will show you all the previous entries and ask you to choose from them.
Filling in Forms Automatically
Once you have installed the software and created a profile, Password Organizer will be able to help you fill in forms automatically. When a form is encountered, Password Organizer will first evaluate it to see if it has sufficient data. If it does, it will then see if your profile is signed in.
If you are not logged in, it will offer to help you and ask you to login.
See image below ôprompt1ö
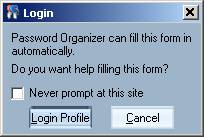
Image 10: prompt1
If you are signed in, it will offer to help you fill the form.
See image below ôprompt2ö
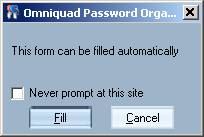
Image 11: prompt2
If you select Fill, the fields in the web-based form will be filled in. You can then check it, fill in fields not handled by Password Organizer and then hit the submit button.
When you click on Fill, holding the Shift button will bring up a screen with all the fields and data being submitted to the site on it. This will let you detect hidden fields that the site is asking for and choose whether or not to submit the same.
See image below ôshiftö

Image 12: shift
Saving Forms
When you enter information in a webpage, Password Organizer will ask you if you want it to save that form. You can choose to save the form if itÆs a form you repeatedly visit. Just enter a label for this webpage that you can easily remember. If you save the webpage, then when you visit that webpage again, Password Organizer will offer to fill it for you automatically.
See image below ôsaveö
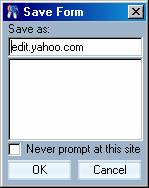
Image 13: save
Filling in Re-visited Forms
When you have visited a form and saved it before, it will create a entry in your Quick Links. This is a button on your Password Organizer Toolbar. If you look at the entries in this dropdown menu, you will find the entry for the particular form you saved. Selecting this opens that form for you automatically. You can also Fill and Submit automatically. This would be an option you can choose when you are revisiting the same form. For example: a login form. In this case, Password Organizer will fill and submit your details for you.
Again, you can choose to just Fill it or to Fill and Submit.
See image below ôfillandsubö
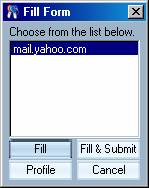
Image 14: fillandsub